

Auto Schedule or AI scheduling?
Auto Schedule follows the options you set in its window and doesn’t use AI credits. AI scheduling plans from what you ask in plain words, like “plan my week”. Both show you a preview before anything changes.
Open Auto Schedule
Step 1: Open the AI Canvas
Open AI Canvas from the menu on the left.
Step 2: Click the lightning bolt
In the toolbar at the bottom of the canvas, click the ⚡ button (Auto Schedule).
Step 3: The first time
A short intro explains how it works. Click Got it, Continue.
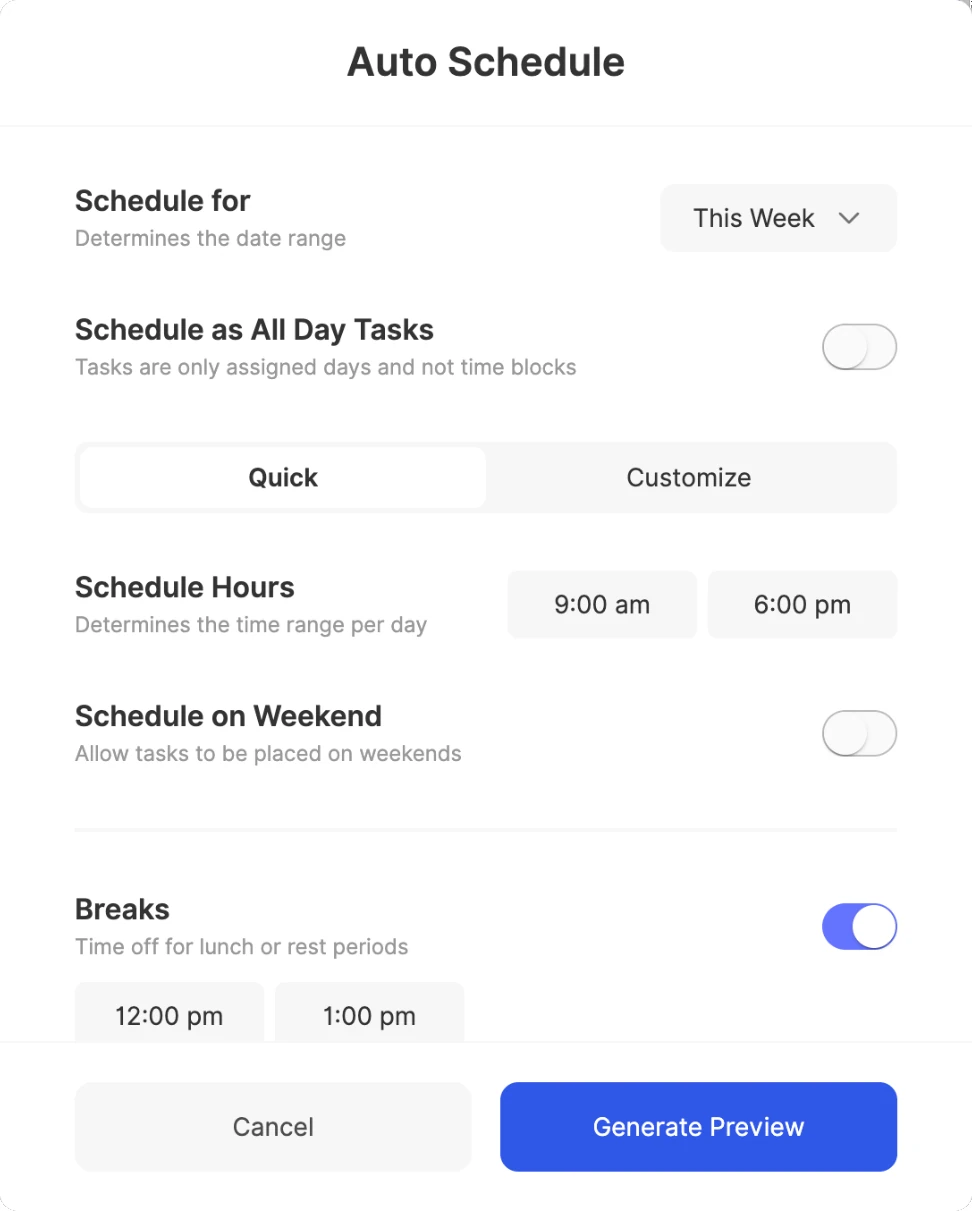
Choose the dates
- Schedule for: Today, This Week, This Month (from today to the end of the month) or Custom, where you pick the dates under Schedule Dates.
- Schedule as All Day Tasks: keeps tasks on their days without giving them times, up to the Maximum Duration per Day you set. It isn’t offered for Today.
Set your hours and breaks
- Schedule Hours: the part of the day tasks can go in. For more than one day, choose Quick to use the same hours every day, or Customize to set them day by day. Tasks can also go in the personal hours and AI Blocks set in Settings → ByDesign AI.
- Schedule on Weekend: lets tasks go on Saturdays and Sundays.
- Breaks: time off for lunch or rest. Click Add Break for another one.
- Buffer between tasks: breathing room between scheduled tasks.
- Default Duration: how long a task takes when it doesn’t have a duration.
- Split Tasks: splits long tasks into smaller blocks. Choose which tasks to split (tasks longer than) and the shortest block (minimum block).
How it decides
- Each task stays on its own day and gets a time there. Tasks with a Deadline go first, the nearest one first, then your highest-priority tasks.
- Things that already have a time stay where they are, unless you turn on Reshuffle Unlocked Tasks or Schedule as All Day Tasks. Locked tasks never move.
- Tasks that don’t fit on their day wait under Unscheduled Tasks in the preview.
Check the preview and accept
Step 1: Generate the preview
Click Generate Preview. ByDesign remembers your options for next time.
Step 2: Adjust it
Drag tasks to new times, or drag an edge to make one longer or shorter. Right-click a task to unschedule it. Tasks that didn’t fit wait under Unscheduled Tasks on the right: drag them onto the calendar.
Step 3: Save or go back
Click Accept & Schedule to save the new times, or Back & Edit to change your options and try again.
Note
When you accept, tasks still under Unscheduled Tasks lose their date. Drag the ones you want to keep onto the calendar first, or click Back & Edit.
Keep a task where it is
Right-click a task on the AI Canvas and choose Lock for Auto-Schedule. Auto Schedule then plans around it and doesn’t move it. Choose Unlock for Auto-Schedule to let it move again.
Good to know
- Tasks with no date aren’t included.
- Events from your connected calendars never move. Lock anything else that must stay where it is.
- On a shared page, only the tasks assigned to you are included.
- It also follows Settings → ByDesign AI: a tagged task goes into the AI Block for its tag when there’s room, and Relaxed days get more room between tasks while Packed days get none.
- Auto Schedule is on the AI Canvas, on the web and in the Mac and Windows apps. The AI Canvas comes with the AI and AI Plus plans.